
Blender 2.49b → UDK v3 (Unreal Development Kit)
How to export a simple mesh from Blender to the UDK
Introduction
I wrote this how-to to fill a gap that I had found. Although there are many web resources for blender and the UDK, and even a handful for exporting static meshes from blender to the UDK, I couldn't get any of them to work. The forums were helpful, but I couldn't find a simple, easy to follow, complete, here's how to go from Blender → UDK tutorial that worked without much head scratching.
Here is what we're going to do
Use the default cube, or create a cube in blender
Mark the seams on the cube, unwrap it in the UV/Image Editor
Add a material to the cube and create an image to texture map onto the cube
Paint some numbers on the sides of the cube
Save the image as a TARGA file
Download a Python script that will allow blender to export the cube in a file format the UDK supports
Export the cube
Import the cube and TARGA (texture) into the UDK
Create a Material with the texture
Map the texture onto the new static mesh
Place the static mesh in a small sample level
Here is what we're not going to do
Learn the ins and outs of blender, the Unreal Editor (UE), etc... This tutorial assumes you are familiar with both of the aforementioned programs and can perform the steps mentioned above. There are tons of tutorials and documents on how to use blender on the 'net. For the UDK, the video training modules that Epic released (made by 3DBuzz) are AMAZING. If you haven't used them and are learning the UDK, get them.
How will you know you've been successful?
You will have a small level, with your blender created, texture mapped box in it!
Let's get started...
Blender
Start blender. Have the default cube centered in your scene. Split your windows so the left side is a 3D view of the cube and the right side a “UV/Image Editor”.

Switch to edit mode and edge select mode (CTRL-TAB, Edges) select the edges shown on the cube. Hit CTRL-E and select “Mark Seam”. Note that I have maximized my work area to show the seams.

Select all of the edges (A), then hit U and select Unwrap.

In the UV/Image Editor, select Image->New...


Put
in the name “cubemap”, leave the width and height at
1024x1024, select the “UV Test Grid” option and click OK.
You may wish to better arrange your UV's, but it's not necessary.
You may need to zoom the UV/Image Editor window out a bit to see the entire image.
Tab into object mode.
Add a material to your object and select TexFace from the Material panel.

Switch to “Texture Paint” mode and go to the editing panel (F9).
Raise the Opacity of your brush to 1 and select the color white.
Paint numbers on each side of your cube using the paintbrush. (NOTE: these are suggestions, use a different color, and paint whatever you like on the cube).

Do a test render to see what it will look like.

Change back to object mode.
Scale the cube – IMPORTANT!!!
You will want to scale your cube significantly before exporting it. Each blender unit is about the same as an Unreal unit and approximately 16 Unreal units is 1 foot. So scale up your cube to at least 32, or more blender units (I think I made mine 40).
Save your blender file. Call it cube.blend.
Save the image you created by selecting Image->Save in the UV/Image Editor. Call it cube.tga and make sure the format is TARGA.
Exporting as an ASE
You now need to export your object as an ASE. Get the python script you need from here:
http://www.katsbits.com/htm/tools_utilities.htm#ase
Click on the text that says Blender 2.44 + ASE export - Goofos
Optionally you can download the file directly from my website: http://wagner-usa.net/udk/goofosASE-2.44v0.6.10b_9sept07.zip
Unzip the downloaded zip file and place the python script it contains (goofosASE-2.44v0.6.10b_9sept07.py) in a directory with your other blender add on scripts.
I place mine in my “My Documents/blenderfiles/scripts” folder. This may not be the best way, but it's how I do it and it works.
In blender, bring down the settings window and click the “File Paths” button.
Click on the folder to the right of the “Python scripts” field and navigate to the aforementioned scripts folder (My Documents/blenderfiles/scripts ).

Click the “SELECT SCRIPT PATH” button and close the settings window. The ASE exporter is now available in the File->Export menu. Use it (see screenshot below)!

When prompted for the export filename, use “cube.ase” and click the Export ASCII Scene button.
Leave the default options selected in the dialog box that pops up and hit the OK button.
At this point you can close blender, however you may want to keep it open and further modify the model later.
You can also edit the cube.tga in gimp or photoshop, or whatever you like. If you want to get fancy, you can use the UV script that saves the face layout in blender (that is beyond the scope of this tutorial though).
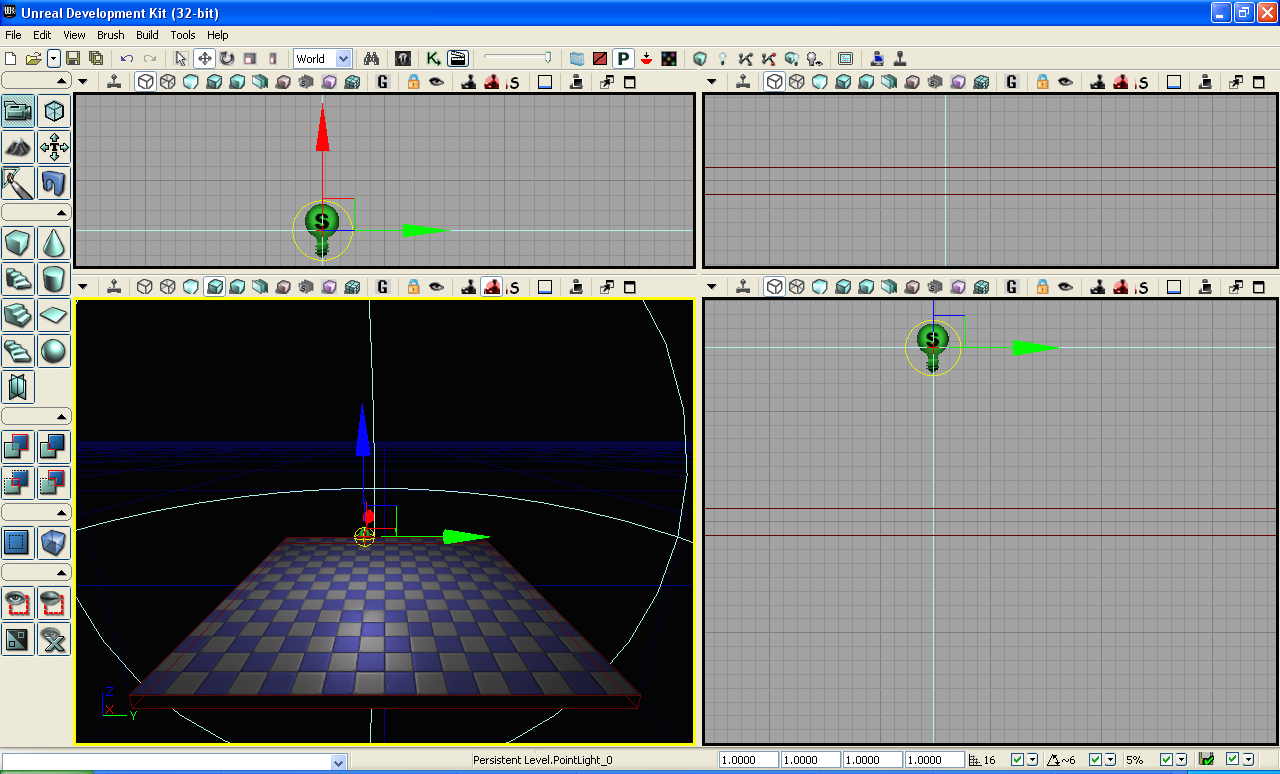
Unreal Editor
Start up the Unreal Editor. Create a platform that is 1024x1024x32 and add a light to it.
Open the content browser and click the Import button on the bottom left.
Navigate to where you saved cube.ase and cube.tga. Select them both and click open.

Click OK on both import dialogs and ignore any message about the vertex ratio that comes up when importing the mesh. Use the package names provided in the dialogs as well.
You should see both your texture and mesh in the content browser now.

If you don't see the cube, odds are you didn't scale it large enough. You can go back to blender and scale it, export it again, then right click on the cube and “Reimport Static Mesh”.
Right-click in the browser in the gray area under the texture and mesh and select “New material”.
Name the new material “cubematerial” and click OK.

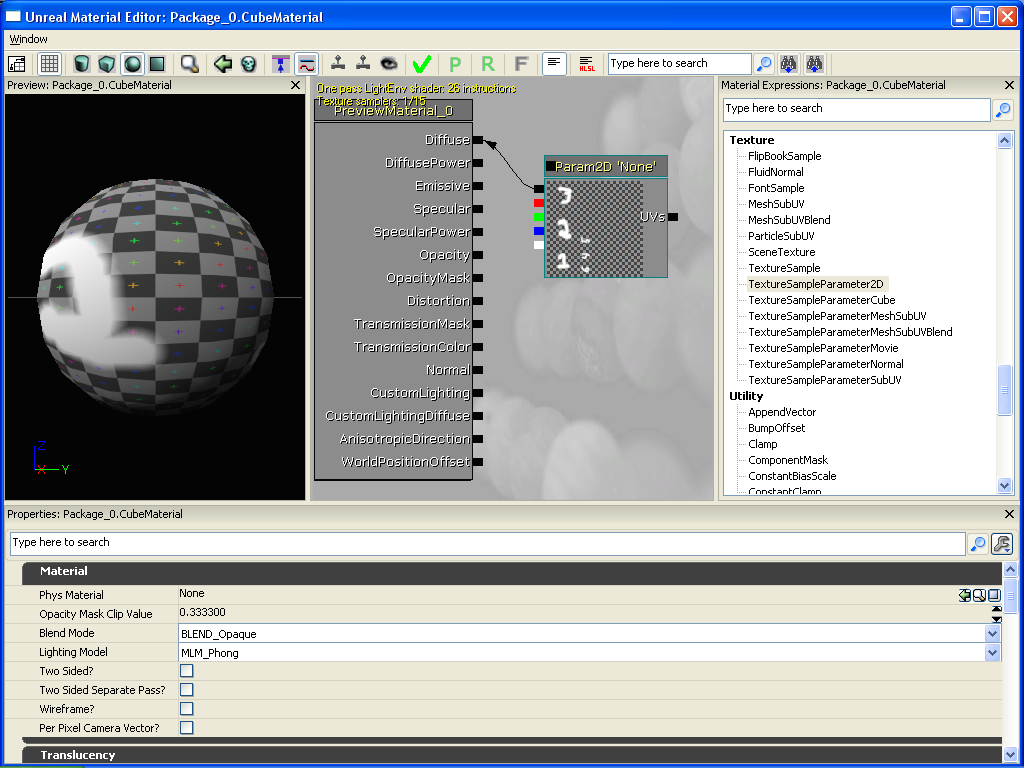
The material editor will open.
On the right side of the material editor, select “TextureSampleParameter2D” and drag into the material editor middle window. NOTE: If you drag the TextureSampleParameter2D into the UE and not the material editor, the UE will crash. Drag it into the material editor.

In the content browser, click on the cube texture (the Targa file you imported) so that it has a yellow border around it.
Back in the material editor, click on the Param2D node and in the MaterialExpressionTextureSample section, Texture property (at the bottom), click the little green arrow on the right side.
You should see “Texture2D'Package_0.Cube'” appear where the word “None” was before.
Drag the topmost link from the Param2D node to the Diffuse link on the material node (see the screenshot for clarification).
Close the material editor, answering “Yes” to save the changes.
In the content browser, double click on your cube mesh to open it in the mesh editor.
Open all of the triangles under LODInfo (i.e. open all of the options).
Select the CubeMaterial in the content browser (don't forget this step!).
In the “Material” property in the mesh, click the little green arrow on the right side.
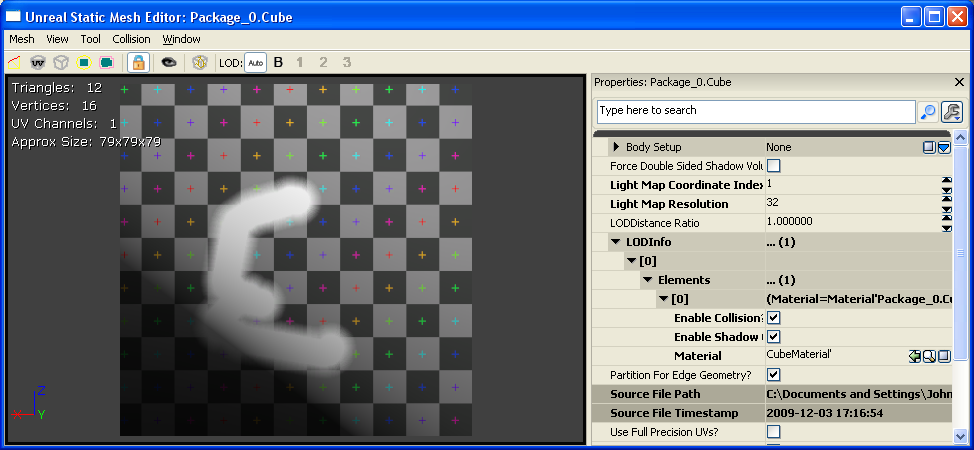
You should see “CubeMaterial” now in the Material section.
Click “Collision->Auto Convex Collision” on the menu bar and click “Apply” then “Close”.
Close the Static Mesh editor.
Select the “Cube” static mesh in the content browser.

Right click on the floor of your level, select “Add Actor->Add StaticMesh: StaticMesh Package_0.Cube” and you should see your cube in your level.
Select “Build all” from the toolbar, then right-click in your level and play from here.
If everything worked out, you should see your cube and it should be solid (i.e. you can't run through it).

Something went wrong
If you can't see your cube in the perspective view, it may be there, but be very, very small. If you didn't scale it in blender, this is the problem. You can scale it up in the UE, or you can scale it in blender, export it again and import it into the content browser (just right click on it in the content browser and select “Reimport Static Mesh”).
More complex meshes
I have successfully imported more complex meshes and textures using these methods.
If you do anything more complex, such as stairs or archways, you will need a more complex collision map.
Thanks!
If you have any pointers or know of a better way to do things, please let me know!
wagdog – email mrjohnwagner over at gmail.
Back to contents